

How To Assemble (Build) Folding Boxes in Different Structures?
Sometimes it is more difficult than expected to assemble the flat-lying boxes. We can empathize with this and have therefore decided to develop instructions for our most demanding folding boxes, with the help of which you can quickly hold your assembled box in your hands. This post provides you with simple folding box guides that will guide you to your destination with ease.
Folding Box Structure in Bag Box Structure
The folding box instructions of the bag box guide guide you to the finished box in seven steps. It should be noted that the insertion tab for the floor should only be pushed down instead of being bent.
- Step 1: Starting position
First, place the glued and flat box in front of you, as you can see in the photo. Set up the box so that it forms a cavity.
- Step 2: Fold the bottom
Now turn the box so that the bottom is pointing upwards. First, fold the largest tab with the punched rectangle. Then fold the same opposite tabs inwards.
- Step 3: Close the bottom
Finally, fold the plug-in tab over and push it down. The plug-in floor is now ready.
- Step 4: Close the lid
Turn the box back so that the insertion tab of the lid is now pointing upwards. At this point, you can already fill the box. Then first press the two opposite edges on the perforated creasing lines provided for this purpose inwards and hold close the bag box at the top with your fingers.
- Step 5: Completion
Finally, you can fold the insert tab down and plug it into the punched hole. The finished bag box is now in front of you.
Folding Box Structure in Mailer Box with Tuck-In bottom
This guide will guide you to your folding carton with a bottom in six steps. Since mainly the plug-in floor has to be folded here, make sure to push the insertion tab for the floor back down again.
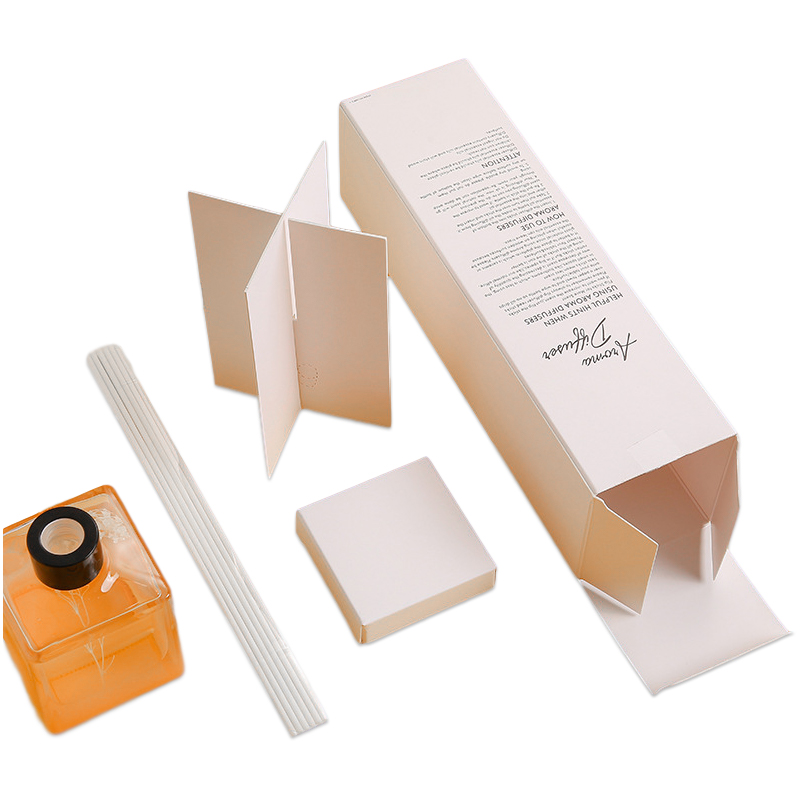
- Step 1: Starting position
First, place the glued and flat box in front of you, as you can see in the photo. Set up the box so that it forms a cavity.
- Step 2: Fold the bottom
Now turn the product so that the bottom is pointing upwards. First, fold the largest tab with the punched rectangle.
- Step 3 – 4: Close the bottom
Then fold the same opposite tabs inwards. Finally, fold the plug-in tab over and push it down. The plug-in floor is now ready.
- Step 5: Close the lid
Turn the box back so that the insert tab is now pointing upwards. At this point, you can already fill the box. Then first fold the small opposite tabs inwards. Finally, fold the insert tab down and insert it into the box.
- Step 6: Completion
The finished folding carton is now in front of you.
Folding Box in Pillow Box Structure
The pillow box instructions only need four steps until you can hold the result in your hands. Here you need to make sure that you do not squeeze the pillow box to fold in the side tabs, as this can lead to unwanted kinks in the box.
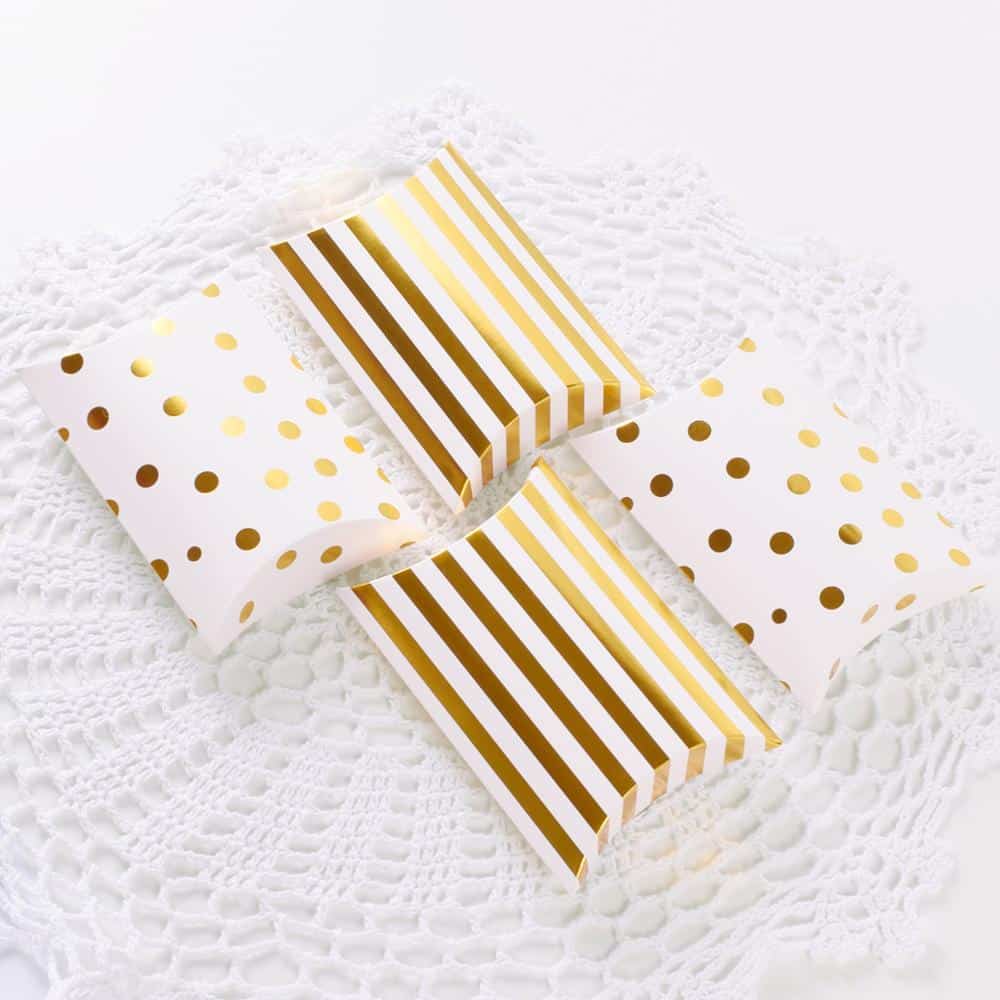
- Step 1: Starting position
First, place the glued and flat box in front of you, as you can see in the photo. Make sure that the side with the grip holes is on the right and left in the tabs at the top.
- Step 2: Fold tabs with grip holes
Now you can fold the tabs with the holes on the right and left down based on the creasing lines. The cavity of the cushion box is automatically formed.
- Step 3: Fold tabs without grip holes
Turn the box so that the side with the tabs is on top without grip holes. Repeat the previous process by pressing the tabs down again on the creasing lines. Before you close both tabs, you can already fill the box on one side.
- Step 4: Completion
The finished pillow box is now in front of you.
Folding Boxes in Handle Box Structure
The folding carton guide to the carrying handle box takes you to your goal in five steps. All you have to do is make sure that the inside of the box points upwards at the beginning.
- Step 1: Starting position
First, place the flat carrying handle box in front of you, as you can see in the photo. Make sure that the inside is facing upwards.
- Step 2: Raise the side with plug-in tabs
First, you can raise the side with the plug-in tabs. The lower tabs must be folded inwards so that they lie on the bottom of the box.
- Step 3: Raise the other page
Before you erect the other side, you can already fold in its opposite long edges. Be sure to fold the edges inwards when erecting the page.
- Step 4: Attach plug-in tabs
Now insert the two insertion tabs from the outside on both sides into the holes provided for this purpose. At this point, you can already fill the box. Then place the box in front of you and pull the large tabs over the noses of the handle.
- Step 5: Completion
The finished carrying handle box is now in front of you.
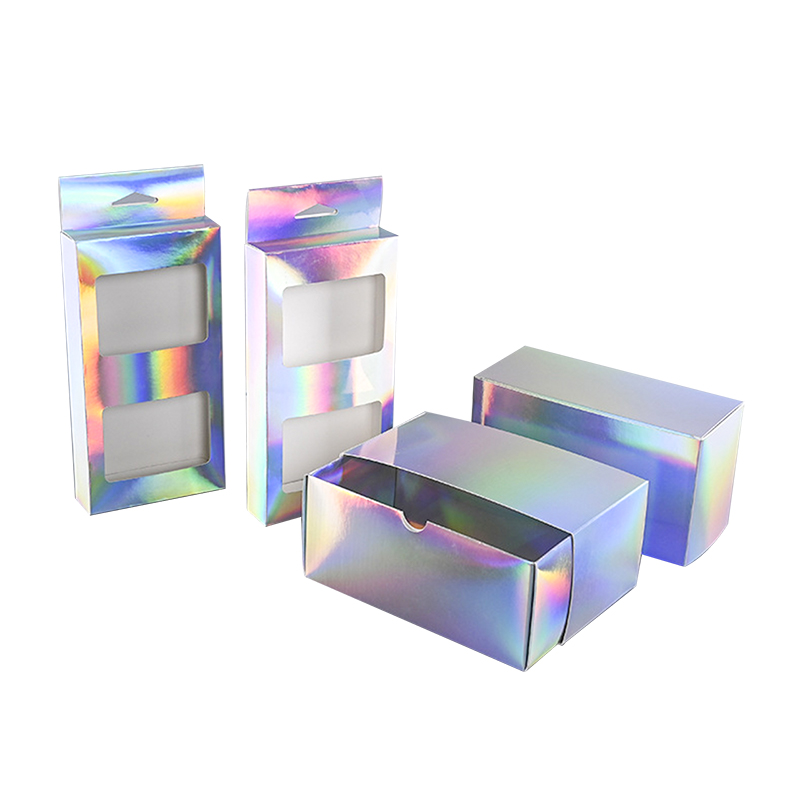
Folding Boxes in Telescopic Box Structure
According to these instructions, the cardboard box is in front of you after five steps. Make sure that the inside of the box is pointing upwards at the beginning.
- Step 1: Starting position
First, place the glued and flat box bottom/lid horizontally in front of you, as you can see in the photo. Make sure that the inside is facing upwards.
- Step 2: Erect long sides
Now you can fold the long sides of the box upwards on the groove lines provided for this purpose.
- Step 3: Fold first side
First, press the two corners to the right and left of the unglued tab inwards. By pressing the corners, automatically open the short tab, which you now have to roll up.
- Step 4: Fold first side
After turning the high side in, the next step follows, which varies between two options depending on the nest size/size. To lock the short sides, drag the lower slope over the curve or clamp the lower slopes backwards.
- Step 6: Fold the second side
Repeat the third and fourth steps with the other side.
- Step 5: Completion
There is now the inverted box bottom / lid in front of you. Repeat the process with the respective counterpart. Then you can already fill the smaller box bottom at this point. Then put the larger box lid over the bottom. The finished cardboard box is now in front of you.


Top 10 Creative Cosmetic Packaging Design Ideas & illustrations 2023 | Luxury-Paper-Box.Com

How the Right Perfume Packaging Sells the Scent

5 Eyewear Packaging Trends Shaping 2026